Dave Van Domelen
2024-05-20 13:56:33 UTC
Dave's Transformers Legacy Rant: Deluxe Wave 8 (United 1)
Animated Universe Bumblebee (compact car)
Rescue Bots Universe Autobot Chase (police car)
Infernac Universe Magneous (stony SUV)
Cyberverse Universe Windblade (VTOL jet)
Permalink: http://www.eyrie.org/~dvandom/BW/Legacy/Deluxe8
Hey, a wave with no G1 or G1-adjacent stuff! Interesting choice to make
this explicitly the Cyberverse Windblade as opposed to RiD15 Windblade,
although that one would technically be in the same shared universe as Chase.
And yes, Rescue Bots gets a Legacy toy, because kids who grew up on Rescue
Bots are now adults (it first aired thirteen years ago).
CAPSULES
$25 price point.
Animated Universe Bumblebee: Good in both modes with a transformation
that is interesting but not a hassle. Really the only downside is that like
the various Generations/Legacy Minibot updates of late, it's really small for
a Deluxe (but a little too big and complex to be a Scout). Recommended.
Rescue Bots Universe Autobot Chase: Burdened with terrible destiny and
trademark overspecification. Also with a rather tortuous transformation, in
service of looking very much like a de-kiddified version of the original
animation model in both modes. Recommended.
Infernac Universe Magneous: Decent design for what it's trying to do,
but it's rather difficult to transform without unintentionally making it a
partsformer. The weapon/armor mode only uses about half the toy at best,
which is a little disappointing that they didn't even try. Mildly
recommended.
Cyberverse Universe Windblade: Mine had an assembly error that's not
detectable in-package, dunno if it's widespread. Good design, although it
has the Generations head rather than the Cyberverse head, for some reason.
(Definitely better than the actual Cyberverse toys of her, but that's not a
high bar to clear.) Recommended.
RANTS
Packaging: Same basic design as the previous Evolution Deluxes, but with
the United trade dress (and lack of QR codes). The boxes themselves are now
heavier corrugated cardboard, like those of the United Voyagers.
AUTOBOT: ANIMATED UNIVERSE BUMBLEBEE
Assortment: F8524
Altmode: Compact car
Transformation Difficulty: 22 steps
Previous Name Use: None with the epithet
Previous Mold Use: None
Origin Universe: Animated
So, three of the five original TF:A crew got into Legacy so far. With
Prime Universe Bulkhead being in the first year, they might not bother with a
TF:A version. There's been so many G1 Ratchets in the last five years, dunno
if they'll bother adding in the TF:A version. I do have suspicions that a
final season Optimus Prime with Magnus Hammer retool will happen at some
point, though.
Packaging: Four plastic ties hold the robot to the inner tray, while the
accessories (stingers and booster rockets) are wrapped up in Autobot symbol
patterned tissue paper behind the inner tray. A good chunk of the
instructions involve how to combine the weapons.
Robot Mode: Short, on a par with the War for Cybertron Minibots, and
more or less to scale with Prowl and maybe Optimus. They did a pretty good
job matching the look of the animation model, within the limits of reality.
Not quite as leggy, the feet aren't flush with the shins, forearms actually
have car kibble, that sort of thing. As usual, the main "off-model" aspects
are the colors, with a lot more black on the thighs and hands. Also, a
consequence of the transformation is that the left (driver's) side of the
hood ends up on the right shin, so his black stripe switches sides.
4.25" (11cm) tall in the usual black and yellow with some silver and
smoky clear. Smoky clear plastic is used for the chest and the upper/inner
backpack, which is going to make some people nervous, and it's also used for
all the weapons. Black plastic is used for the torso core, shoulder roots,
biceps, fists, pelvis back, hips, thighs, knees, kneepads, boot cores, heels,
front soles, and wheels. Bright yellow with a painfully bright UV response
makes the head, backpack, shoulderpads, forearms, pelvis front, outer boot
shells, and tops of the feet.
There's yellow paint on the chest for the roof and window posts, not a
very good match to the plastic. Black face outline and V-like shape on top
of the helmet (but it doesn't go all the way back or fill in the vents on the
sides and back...easy enough customization), plus on the stripe on the left
side of the chest and down the right shin. The face is silver and the eyes
are bright blue, his smirk is not separately painted. There's a red Autobot
symbol printed on the center of his sternum. The wheel hubs are silver.
The neck is a ball and socket joint with the socket in the head, and the
root of the neck strut is on a piece that's got a transformation hinge, which
tends to let the head rock back a bit during normal handling. The waist is a
smooth swivel and unobstructed. The shoulders are a bit odd, with a hinge and
swivel attached to the fender/shoulderpad, but then another hinge between the
shoulderpad and the upper arm. The upper arm hinge is supposed to be pushed
up as far forwards as it'll go, so that the fender points upwards in back.
Not quite the animation model look, but close. There's swivels just above
the hinge elbows, and swivel wrists. Pinned hinge and swivel hips with upper
thigh swivels hidden inside the thigh armor, and hinged knees. The ankles
have a little wiggle room both forwards-backwards and side to side, but are
mostly held into a narrow range by the blockages around the hinges.
The hands can hold 5mm pegs. There's also 5mm sockets on the backpack's
back (for holding the boosters), the outer faces of the backpack (kinda
blocked, more for vehicle mode), the outer faces of the lower edges of the
boots. There's no 3mm sockets, nor are there any sockets in the soles of the
feet.
The booster/thruster accessories are unpainted smoky clear plastic,
despite the boosters in the show being yellow and black with silver fins.
They basically look like footballs with fins. The mold line pattern doesn't
fit the color scheme from the show, should you want to paint them yourself.
Each is 1" (2.5cm) long with a 5mm peg for attachment to the back or use as a
pistol grip, and a 3mm socket for inserting the stinger halves as
thrust-style Fire Blasts (you'd need 3mm peg Fire Blasts otherwise, I have
many thanks to commissioning Trent Troop on Shapeways).
Now, they went with the choice to not give him individual stinger
weapons, not really. I mean, you can mount the half-hexagonal-point halves
on the booster rockets to make stinger pistols or something, but they really
only went for the "hands merge to form the stinger weapon" bit. Stow the
hands as in vehicle mode (open up door panels on the forearms and fold the
fists into the forearms) and peg the two stinger halves together, then plug
the 3mm studs on the ends of each stinger half onto the 3mm wrist sockets
that result. The stinger is 2cm (0.75") long and made of clear plastic with
a silver base and alternating silver and clear blue stripes. The arms can
barely cross together enough to hold this, and there's a pretty limited range
of motion before something pops off. Unfortunately, the angling of the wrist
stumps makes this weapon pretty unusable except in the "arms together in
front of the chest" form, nor is there any other double-socket place the
whole thing can go. There's also nowhere to store them when not in use
except on the boosters.
Transformation: Open the forearms to stow the fists as with the stinger
weapon, but leave the panels open. Lift up the chest so that the chest and
backpack become the car roof, with the robot head tucked inside. And now it
gets weird. Rotate the waist 180 degrees. Fold open the shins and stow the
kneepads, then rotate the fender/hood pieces 180 degrees so the kneecap end
is down by the feet, which fold back in. Snap these together for form the
front third of the vehicle, and bend at a spine joint (not really usable in
robot mode) to bring them up under the windshield. The back bit of the
backpack folds down to become the hatchback gate and rear bumper, then
massage the arms into place as the doors and rear wheels. The colors don't
match up well on the sides behind the windows, but you're supposed to put the
booster rockets in place there to hide that problem.
Going back to robot mode is pretty straightforwards, and it helps to
start by pulling the hood halves apart so you can loosen things enough to get
all the other tabs undone. It's easy to forget to fold out the kneepads.
Altmode: Technically a police car in that Bumblebee copied Captain
Fanzone's car, rooftop light and all. There's surprisingly few hinges
messing up the lines of this mode, really just the ones under the side
mirrors (there's another hinge that's smoothly integrated into the spoiler).
Quite dinky at 3.25" (8cm) long, a little longer total if you count the
booster/stinger combos plugged into the sides near the back. The color
matching is so-so between yellow paint and yellow plastic, but only a little
of it actually had to be painted. Most of the vehicle shell is bright yellow
plastic. The clear slightly smoky plastic of the chest is the windshield and
front of the roof, while the rest of the side windows and the rooftop light
are a plugged in piece of clear slightly smoky plastic fitted into a yellow
structural roof and sides piece. The wheels are black, but the rest of the
black plastic is hidden inside (other than a bit above each rear fender, but
putting the boosters in their intended spots hides this too).
The various paints from the chest remain visible on the front roof
section, with the Autobot symbol now on the roof. The gloss black stripe
runs all the way from the grille to the spoiler (except for the windshield)
on the driver's side, although the hood bit is a little displaced to the side
compared to the roof. The grille itself is also gloss black. The rooftop
light is painted clear red, and the headlights and wheel hubs are silver.
Six 5mm sockets in total are accessible. The two from the backpack are
now on the rear bumper, the ones from the sides of the back are more
accessible and used to hold the boosters, and there's also sockets just under
each hinge behind the front fenders. There are no underside sockets, and no
internal storage for any of the accessories.
Somewhat minimal ground clearance mainly due to the forearms on the
underside, but it rolls well on pinned wheels.
Overall: Other than the usual "Minibot for a Deluxe price point"
complaint Generations/Legacy has been vulnerable to since Earthrise, this
is a pretty good toy.
AUTOBOT: RESCUE BOTS UNIVERSE AUTOBOT CHASE
Assortment: F8525
Altmode: Police Car
Transformation Difficulty: 18 steps
Previous Name Use: None with the epithets
Previous Mold Use: None
Special Unit: Rescue Bots
Origin Universe: Rescue Bots
Technically, he's a Rescue Bot rather than an Autobot, but that
distinction kinda faded over time.
Gotta say, about the only things I figure are less likely than Rescue
Bots in Legacy are Go-Go-Gobots and more obscure and repack-heavy Japanese
lines like Transformers Go! or Kissplay.
Packaging: Five plastic ties hold the robot to the tray, while the
accessories are wrapped in Autobot symbol pattern tissue behind the tray. Be
careful opening it, there's a lot of tiny pieces, ironic for a character who
originates in a child-safe line.
Robot Mode: A somewhat leggy interpretation of the animation model, but
otherwise surprisingly close to how he looked in the original show. The main
differences other than proportions are purely in the realm of colors or paint
apps. He has an Autobot symbol instead of a Rescue Bots symbol, his neck is
the same color as his helmet instead of being the same color as his face, the
fists are black instead of blue, and he has the usual lack of paint on his
wheel hubs. His pegged-on forearm bits (I hesitate to call them weapons, I
guess they're supposed to be sirens or something?) even have the "red one is
round and blue one is trapezoidal" thing going on. They chose to have his
visor opaque rather than letting his glowing eyes show through it. The
lightbar is not removable, but is in its proper position behind the head.
5" (12.5cm) tall in mostly dark blue, white, and lightish gray, with
some silver and clear primary colors. Clear colorless plastic is used for
the torso front (except the panel in the sternum), the lightbar behind the
head, headlights inserted into the "spats" atop the feet, and the
accessories. Dark blue plastic makes up the head, back, sternum panel,
shoulder struts, boot shells, "spats," and feet. Lightish gray plastic is
used for the lower biceps, pelvis core, thighs, knees, and the "bones" of the
lower legs. Black plastic for the fists and wheels. The shoulderpads,
not-quite-wings, forearms, outer pelvis, and hip caps are white plastic.
Lots of dark blue paint with a decent match, found on the center of the
chest, most of each shoulderpad, and panels on the back and butt. There's
some white paint on the non-window parts of the chest that aren't dark blue,
with a red on white Autobot symbol printed on the chest. The face, the
center of the lightbar, and the housings of the siren tools are painted
silver. The visor is painted metallic blue, while the police shield on the
forehead is painted metallic gold. The lightbar sides are painted clear
medium blue and clear red, and the windows and headlights are painted clear
yellow.
The neck is a limited ball joint, although if you don't have the chest
locked down properly the whole neck root piece can fold down a bit on a
transformation hinge. The waist is a smooth swivel not blocked by anything,
although it is a snap-in so be careful of any mold flash in there. The
shoulders are hinge and swivel joints on the ends of struts that can sort of
sag even if you have the chest locked down properly. The kibble winglets on
the back are technically far enough out of the way to not block the
shoulders, but they don't lock out of the way and can fold inward easily.
Swivels just above the hinge elbows, while the wrists just have fold-inward
transformation hinges. Pinned hinge and swivel hips, lower thigh swivels,
hinge knees that can bend a little bit the "wrong" way for transformation
(with little tab and slot bits to hold the legs like that). The ankles only
have side to side hinges, but the heels can fold down on transformation
joints to help with stability in some dynamic poses.
The fists can hold 5mm pegs, and there's 5mm sockets on the outer faces
of the forears, the upper outer faces of the shoulders, one in the small of
the back, one each on the upper outer faces of the boots, and one under each
foot. There is a 3mm socket in the back of the pelvis.
His main accessory is based on the original's Energize Gear Rescue Claw,
made of clear colorless plastic painted clear bright blue. It's made up of
three pieces, a core that fits over either fist or can plug into a 5mm socket
via an unpainted peg, and two claw pieces (also clear colorless plastic
painted clear bright blue) that go into 5mm sockets on the front of the
core. I've found that the Rung-style Fire Blasts can go well in place of the
claw pieces as...I dunno, taser bolts. And the claw pieces can go into the
siren tools to become arm blades. The core also has a 5mm socket on top, if
you want to mount a siren tool on it too? The whole thing assembled as a
rescue claw is 1.5" (3.5cm) long, with a little less than half the length due
to the core piece. The tool stores in vehicle mode on the back, using the
socket that had been in the small of the back.
The siren tools are made of clear colorless plastic with silver paint on
the housing part and clear red or clear blue paint on the business end. The
red one has a round end and is 15mm long, while the blue one has a
trapezoidal end and is 13mm long. Each attaches via a 5mm peg (forearms are
the default locations), and have 5mm socket "muzzles" on the clear colored
part.
Transformation: "Rescue Bot" and "complex transformation, bordering on
frustrating," do not generally go together, but boy howdy do they go together
this time. The thing that took me the longest to figure out without looking
at the instructions was that the sternum bit folds down to let the torso
front fit over the head...the head pops off pretty easily, though, and I was
tempted to just go with that the first time and worry about the right way
later. :) I suspect that doing this right after transforming Bumblebee, who
doesn't need a fold-out panel to get his head inside the roof, primed me to
not look for such a solution here.
Once properly transformed, it is REALLY solid. Like, so solid that it's
hard to get it started on going back to robot mode.
Altmode: A definite police car, no technically about it unlike Bumblebee
above. A muscle car basis with exhaust pipes (unpainted) sticking out in
front of the rear wheels. They did a nice job with various little details,
such as the police shield molded into the center of the grille. The back end
is a little gappy thanks to the way the legs transform, with the tops of the
hips making up much of the rear bumper. This, too, looks like a de-chibified
version of the animation model, good job on the part of the designers.
4.5" (11cm) long in mostly dark blue with some white and silver. The
front third is the dark blue plastic, as are the roof center (the folding out
bit of the chest), a little of the rear window and trunk, but the rest of the
dark blue is paint. The section with the windows from the chest is still
visible clear plastic painted clear yellow with dark blue and white paint.
The lightbar piece is also clear plastic, with clear blue on the right and
clear red on the ieft, but opaque silver in the middle, and the headlights
are clear plastic painted clear yellow. The wheels are black with no paint,
the rest of the vehicle shell is white plastic, with the doors and the rear
bumper left unpainted and the rest painted dark blue. The front grille is
painted silver.
There's 5mm sockets on each door, on the sides ahead of each door, on
the sides of the rear bumper, and one on the trunk lid that's mostly there
for the Energize Gear claw. You can almost store the small siren tools on
the underside in the fists, but they extend a couple millimeters too far
down. This does leave the fists accessible for 5mm peg flight bases. (The
3mm socket from the robot butt is now on top of the rear end of the trunk.)
It rolls okay on snap-on wheels with about 2mm of ground clearance, the
pelvis in back is the main obstacle.
Overall: This does a very good job of looking like a non-kiddie "how
he'd look if he visited RiD15" design for Chase in both modes, although the
transformation required to make this work can be a bit tortuous at times.
The use of clear plastic for some structural joints does make the difficult
transformation more of a worry point, since stress is more likely to happen.
Still, a very good first Generations/Legacy interpretation of a Rescue Bots
original character.
INFERNAC: INFERNAC UNIVERSE MAGNEOUS
Assortment: F8526
Altmode: Stony SUV
Transformation Difficulty: 10 steps
Previous Name Use: None
Previous Mold Use: None
Function: Armorizer
Origin Universe: Infernac
Packaging: Three regular ties and a double tie across the chest hold the
robot to the inner tray, and the usual tissue packet in back for
accessories. Well, the weapon and the vehicle roof, which has to be detached
to let the figure fit in the standard box.
Callout on the back shows Bumblebee wearing the armor bits, but the
instructions show Voyager Animated Optimus Prime wearing them...they fit him
a lot better.
Robot Mode: Between the design of the helmet and some of the stony
frills, this feels like they're at least considering a redeco as The Fallen.
Of course, there's at least two known retools/redecos already in the pipeline
that aren't the Fallen, so I may be guessing too much (retool Nucleous for
regular release, and then a straight redeco as part of the Walmart Capsule
set of Thundertron which throws in a Deluxe and a flag-deco of Ratbat to bump
it up to Leader price point). The build is generally squat, and the chest is
hollow with the gap visible between the wheels that form his pecs. (The
chest cannot fold open unless you detach the shoulders and start
transformation, and the wheels can't be opened up in robot mode in any case.)
5" (12.5cm) tall in various shades and tones of gray (some warm, some
cool), plus some black, a little silver, and yellow eyes. Black plastic is
used for the wheels, elbow joints, hip joints, knee joints, and ankle
joints. The rest is made of fairly neutral medium gray plastic, although a
more flexible variety is used for the back, shoulder roots, biceps, fists,
abdomen, and the upper ankle joint pieces. There's also some unintentional
batch variation that shows up under UV.
There's a cool lighter gray paint on the pecs, the roof of the backpack,
the forearm armor, and the fender chunks on the boots. There's black paint
on the faceplate, vent details on the kneecaps, and the windows on the
backpack. The bumper detailing atop the torso is painted metallic gunmetal,
as is the butt. The trim on the backpack windows is silver, and the eyes are
bright yellow. There's some use of texture to create the illusion of color
changes here and there as well, such as the shoulder fronts. There's no
faction symbol on the toy, just as there was none on the box or in the
instructions.
The neck and waist are smooth swivels. The arms connect via 5mm pegs,
but these are the only joints that are pegs. There's snapped-in lift up
hinges inside the shoulderpads. Swivels just above the hinge elbows, and the
wrists are ball joints that can turn or bend inwards for transformation.
Pinned hinge and swivel hips, swivels just above the hinge knees. Ankles are
hinged to tilt side to side as well as bend forwards for transformation, plus
some forwards-backwards rocking at the end of the transformation strut.
Fully assembled, there's just 5mm socket fists and a 3mm socket in the
back of the pelvis. There's also 5mm pegs on the outer faces of the
shoulders, although none of the stuff in the instructions takes advantage of
them. The backpack is attached via a single 5mm peg that goes into a socket
on the back (and one of the known retools takes advantage of this to swap in
a different roof). The forearm armor pieces are pegged on, with shallow tabs
and slots keeping them from easily rotating. If you want to mount the roof
as a shield on the forearm, you'll need to pop off the relevant armor bit
(which can be stored on the back). The fender pieces on the boots are
removable, exposing two 5mm sockets on each boot.
The weapon is a sort of pickaxe thing 1.75" (4.5cm) long with a 5mm peg
grip and a 5mm peg on the side of the haft that lets it be held as a sort of
crossbow I guess (the side peg can only be used for storing the weapon on the
back if you have the roof off and held as a shield). It also has some
nonstandard rectangular tabs to attaching to vehicle mode, or for making the
hammer weapon that involves the shins and feet as well (see later in the
review).
Transformation: A little trickier than "10 steps" would suggest,
although part of that is the fact that as a figure that's designed to come
apart into pieces, it can be hard to AVOID taking it apart during
transformation. And it's certainly easier to transform if you leave the roof
off until late in the process. It's also easier to get the feet folded onto
the pickup bed if you pop the piece off first. So, technically this can be
transformed without going to partsforming, but in practice...well, bits keep
falling off anyway. One annoying bit is that the shoulder roots need to pull
out a bit to unlock the chest, but this isn't a direction the joint can
really go, it's more a matter of flexing the plastic.
Altmode: A rock-covered pickup truck, with the robot shins and feet
taking up the bed of the truck, and various shardes that maybe were supposed
to be crystal. There's occasional mechanical details, like the mesh-covered
windows in front and on the sides, or a few vents here and there, and the
grille in front with brushguard. Basically, from a distance it looks like a
truck, closer up it looks like a pile of rocks in a truck shape, and even
close it looks like a truck with rocks stuck to it.
4.75" (12cm) long and various shades of gray with some black and
silver. Other than the wheels, which are black plastic, it's all medium warm
gray plastic. The lighter cool gloss gray paint ends up on the roof, the
wheel covers, and the side lower fenders with the crystal splash pattern. In
all cases, the paint has hazy borders on purpose. The windows are matte
black with silver borders, the front bumper is dark gunmetal gray. The
kneecap vents are visible in back as is their black paint.
The front bumper has a non-obvious 5mm socket that the axe can go into
as a sort of vehicular weapon, but the axe is mainly intended to go on top of
the pickup bed junk via non-standard pegs. There's a 3mm socket on either
side rearward of the front wheels. The only connectors on the underside are
5mm pegs.
Armor Mode: This kinda cheats, in that only about half the mass of the
toy becomes accessories, to go by the instructions. The foot/shin pieces
come off and combine with the axe to become a hammer, the forearm armor bits
go on another figure's forearms, the rest of each arm can kinda dangle off
the sides of another figure's boots, and the roof can be a shoulder shield.
The rear wheel chunks are removable, but the instructions have no suggestions
for putting them on anything else, so probably best to leave them in place
and treat the stripped down vehicle mode as a chonky skateboard or
something.
If you make the hammer and still want Magneous to wield it in robot
mode, the rear wheels can be flipped over so that the robot becomes an
unstable ("some poses require external support") wheel-foot bot.
Loading Image...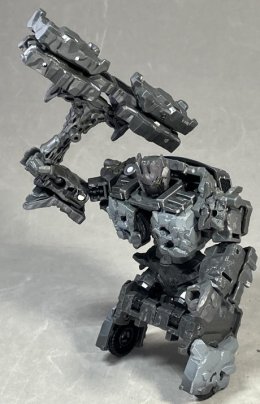
Overall: A decent design for the whole Rock Lords homage, although I'm
not sure I'd say it's good enough to get three versions of it or more. (I'm
probably only getting the Walmart set with another redeco if I find it at
Ross, for instance.)
AUTOBOT: CYBERVERSE UNIVERSE WINDBLADE
Assortment: F8528 (skipped number might be part of the next wave)
Altmode: VTOL jet
Transformation Difficulty: 16 steps
Previous Name Use: None with that epithet
Previous Mold Use: None
Origin Universe: Cyberverse
Note, mine was misassembled or had a molding error that prevented
correct assembly, so the canopy wasn't flush against the cockpit piece. When
I tried to adjust it, it simply snapped off entirely, since it was only
connected at one of the two tabs. I think what happened is that it wasn't
pushed in properly and the glue just pooled in the bottom of the forward
slot, so I had to Dremel it out to get the tab to go in and reglue around the
snapped part. This theory was confirmed when the Dremel's first-removed
stuff was clear colorless instead of the red plastic of the fuselage piece.
No idea how common this assembly error is, but it's hidden in the backpack
in-package so you can't really check for it before buying.
Packaging: Six ties hold the robot to the tray with the wings way up.
The sword and the headdress piece (a "tessen fan") are wrapped up in the
tissue bundle in back.
The tip of the nosecone should be folded up for robot mode, but the
instructions don't have that "get it out of packaging mode" stuff.
The box render shows the hoverfans unpainted, or has the unpainted side
facing the camera in both modes. Mine was packaged with the painted side
facing backwards in robot mode, but it's hard to tell from the monochrome
instructions whether that was intended. Since they're adjustable, you can
always make the painted side face whichever way you want. TFWiki suggests
that this is so that you can either have show-accurate silver/gray or
toy-accurate black.
Robot Mode: While this is supposed to be the Cyberverse version, and the
body does a pretty good job of matching that within the bounds of "can
actually transform," they went with the head of the original Generations head
from 2014 (including the detachable fan) instead of the Cyberverse design.
This makes me wonder if anyone's already made a "show-accurate" replacement
head for this toy. Anyway, like just about every RiD through Cyberverse
character, the toy lacks a lot of the blue glow paint apps (notably around
the hoverfans and in the joints between pelvis and thighs), but she does have
most of the bright blue (unlike the recent Strongarm).
5.25" (13cm) tall at the head, total "shelf height" depends on how you
position the wings. Mostly red and black with some bright blue, gunmetal,
and accent colors. Red plastic is used for the wings (except the VTOL fans),
the backpack shell, torso front, shoulderpads, forearms, pelvis, and boots.
Black is used for the head, torso core, some stuff inside the backpack, the
VTOL fans, shoulder roots, upper arms, hands, thighs, knees, feet, and the
fins on the boots. The sword is clear colorless plastic, more about it
later.
The face is painted pearly white with red makeup, the eyes and tiara
front are bright blue, and there's gold accents around the tiara and on the
hair fan. There's metallic gunmetal on one side of each VTOL fan, on the
abdomen, and on the shins. Bright blue paint is also on the kneecap gems,
the wrists, and the bikini top border on the chest. There's some matte black
paint on the backpack.
The neck is a ball and socket joint with the socket in the head and a
good range of motion despite the collar. The waist is a smooth swivel,
although if you have the sword on the hip it can get in the way of the
backpack if you turn too much. The wings have double hinges so they can go
up and down or flap a bit (the backpack restricts this). The VTOL fans are
on axles that let them swing around, and they snap in place. The shoulders
are pinned hinge and swivel joints, with the lifting hinges being soft-
ratcheting. Swivel at the top of the bicep, hinge elbows, swivel wrists.
Pinned hinge and swivel hips, upper thigh swivels mostly concealed by the
thigh armor, hinge knees. The ankles have sideways hinges, plus the toes are
separately hinged to fold down.
The hands hold 5mm pegs, but with only 3/4 of the circle, so they do
have trouble with 5mm by 2mm tabs. Shallow 5mm sockets on the fronts
(undersides) of the wings, two on each wing. There's a deep 5mm socket on
the underside of each toe and of each heel, and deep 5mm sockets on the outer
upper faces of the boots. There's a 5mm socket on the back of each
shoulderpad, but I'm not sure why...they're covered by the wings in this
mode, and even more covered in vehicle mode. No, the wings can't really gold
out the the way much due to the backpack, not enough clearance to really do
much with this socket. There's the usual 3mm socket on the back of the
pelvis, plus one on the outer face up each upper thigh so you can stow the
sword there. There's also 5mm pegs on the boots, but they're for
transformation and only about 2mm of peg sticks out far enough to connect
anything.
Unlike most Windblade swords, which tend to be either solid metal of
some sort of clean energy blades or crystal shards, this is more of a torch
with flames writhing around in the vague shape of a blade. This is so that
it can sort of double as exhaust flames in jet mode. A single piece of
colorless clear plastic 4" (10cm) long, with a 5mm diameter hilt that thins
to a tab at the pommel (2.5mm thick for the last 5mm of the hilt, which is
long enough to keep the sword from plugging into even the deeper sockets
other than the hands). The hilt part is painted matte black except for the
3mm studs on either side and a bit around each, while the blade is painted
clear warm purple.
Note, while shown as a removable accessory, the hair fan is kinda
difficult to get back out once inserted. I needed a knife or similar thin
wedge to get it back out. Also, because of the 3/4 circle hand sockets, the
fan can only be held at a specific kinda weird angle. Fortunately, and not
revealed in the instructions (I found out from TFWiki) the slots in her palms
let the fan be inserted more securely and held more like a proper fan. This
slot is too narrow to put the sword pommel in it, though. Anyway, it's...
very easy to lose, and I ended up taking a rather long time searching for it
after dropping it while trying to measure it. It took a weird bounce, as
often happens thanks to Murphy's Law. Anyway, it's 13mm tall and 17mm wide,
with a rectangular tab on the back to attach to Windblade's head, and a
rectangular 5mm by 2mm tab for holding as a weapon. I recommend just putting
it on her head and never taking it off again.
Transformation: Important note, the backpack opens up to unfold the nose
end, but the hinges are at the top rather than the sides! It opens like
beetle shell pieces rather than like doors. Then it folds closed around the
head, and it's easier to get the nose wheel out before closing it. Rotate
the waist 180 degrees, and them the boots split apart weirdly to fold around
the thighs, with the backs of the boots tabbing onto the backs of the thighs
to provide the rear supports (they're more fins than landing gear, but they
do the job). Before you finish connecting the legs up, put the sword between
them using 3mm sockets on the insteps of the feet. The wings fold into place
around the knees, and the robot hands grip 5mm pegs on the backs of the shin
pieces (not mentioned in robot mode, because they're not really useful for
anything in that mode).
As noted above, you need to insert or remove the sword at a particular
point in transforming the legs. Getting it in or out later requires slightly
untransforming the rear part of the jet. If you'd rather not mess with this,
the hilt side pegs can also go into the pelvis-back socket on the underside.
It can still only point backwards here, the breasts get in the way of the
blade pointing forwards.
Altmode: A little bulkier than the animation model, but sleeker than
some interpretations of the VTOL jet mode. The robot arms just kind of stick
to the sides, with the fists grabbing onto pegs, but otherwise it's decent.
It has small VTOL rotors on the leading edges of the wings, and a clear
canopy which may or may not lie flush with the nose. The kneecap details are
just sort of on top of the fuselage, but the shin details look like they
could pass for vectored thrust intakes.
Ignoring the sword sticking out the back, it's 6" (15cm) long with a
wingspan of 5.5" (a little under 14cm). The vertical and side tail fins are
black plastic, as are the thrusters. The nose and nosewheel are black
plastic, the canopy is clear colorless plastic. Other than some visible
joint bits, the rest is red plastic.
There's matte black along the leading edge of the wings and the
underside of the nose. The canopy window borders are painted red. The dark
silver of the VTOL fans and the shins is now on top, as are the bright blue
kneecaps.
The four 5mm sockets on the wings are mostly accessible, although the
ones nearer the roots are almost blocked. The thruster nozzles (robot heels)
are 5mm sockets, and the pelvis rear's 3mm socket is on the underside as
noted earlier. The toe sockets are no longer accessible, the hands are on
pegs but I suppose could be folded out if you needed even more underwing
connections. And, as noted in robot mode, the back of shoulder sockets are
half covered by the wings now. I really wonder why they even bothered,
unless the main purpose was just to have posts to support the wings better
and they decided to make 'em sockets just in case it could be useful somehow
in robot mode. The nose wheel is hinged to fold down, while the rear
supports/fins are fixed in place. Note, the sword hilt's thin pommel does
not allow it to connect to any 5mm sockets shallower than the length of the
tab, which basically means all the ones available in this mode unless you
pull out an arm for weird hybrid mode.
Overall: I have a lot of Windblade toys, most of which are on or near my
Metroplex for obvious reasons, and this is definitely one of the better
ones. I'd put it with the original Generations version, better in some ways
and not as good in others.
Dave Van Domelen, will take a break to quickly cover Page Punchers
before going back to more Legacy.
Animated Universe Bumblebee (compact car)
Rescue Bots Universe Autobot Chase (police car)
Infernac Universe Magneous (stony SUV)
Cyberverse Universe Windblade (VTOL jet)
Permalink: http://www.eyrie.org/~dvandom/BW/Legacy/Deluxe8
Hey, a wave with no G1 or G1-adjacent stuff! Interesting choice to make
this explicitly the Cyberverse Windblade as opposed to RiD15 Windblade,
although that one would technically be in the same shared universe as Chase.
And yes, Rescue Bots gets a Legacy toy, because kids who grew up on Rescue
Bots are now adults (it first aired thirteen years ago).
CAPSULES
$25 price point.
Animated Universe Bumblebee: Good in both modes with a transformation
that is interesting but not a hassle. Really the only downside is that like
the various Generations/Legacy Minibot updates of late, it's really small for
a Deluxe (but a little too big and complex to be a Scout). Recommended.
Rescue Bots Universe Autobot Chase: Burdened with terrible destiny and
trademark overspecification. Also with a rather tortuous transformation, in
service of looking very much like a de-kiddified version of the original
animation model in both modes. Recommended.
Infernac Universe Magneous: Decent design for what it's trying to do,
but it's rather difficult to transform without unintentionally making it a
partsformer. The weapon/armor mode only uses about half the toy at best,
which is a little disappointing that they didn't even try. Mildly
recommended.
Cyberverse Universe Windblade: Mine had an assembly error that's not
detectable in-package, dunno if it's widespread. Good design, although it
has the Generations head rather than the Cyberverse head, for some reason.
(Definitely better than the actual Cyberverse toys of her, but that's not a
high bar to clear.) Recommended.
RANTS
Packaging: Same basic design as the previous Evolution Deluxes, but with
the United trade dress (and lack of QR codes). The boxes themselves are now
heavier corrugated cardboard, like those of the United Voyagers.
AUTOBOT: ANIMATED UNIVERSE BUMBLEBEE
Assortment: F8524
Altmode: Compact car
Transformation Difficulty: 22 steps
Previous Name Use: None with the epithet
Previous Mold Use: None
Origin Universe: Animated
So, three of the five original TF:A crew got into Legacy so far. With
Prime Universe Bulkhead being in the first year, they might not bother with a
TF:A version. There's been so many G1 Ratchets in the last five years, dunno
if they'll bother adding in the TF:A version. I do have suspicions that a
final season Optimus Prime with Magnus Hammer retool will happen at some
point, though.
Packaging: Four plastic ties hold the robot to the inner tray, while the
accessories (stingers and booster rockets) are wrapped up in Autobot symbol
patterned tissue paper behind the inner tray. A good chunk of the
instructions involve how to combine the weapons.
Robot Mode: Short, on a par with the War for Cybertron Minibots, and
more or less to scale with Prowl and maybe Optimus. They did a pretty good
job matching the look of the animation model, within the limits of reality.
Not quite as leggy, the feet aren't flush with the shins, forearms actually
have car kibble, that sort of thing. As usual, the main "off-model" aspects
are the colors, with a lot more black on the thighs and hands. Also, a
consequence of the transformation is that the left (driver's) side of the
hood ends up on the right shin, so his black stripe switches sides.
4.25" (11cm) tall in the usual black and yellow with some silver and
smoky clear. Smoky clear plastic is used for the chest and the upper/inner
backpack, which is going to make some people nervous, and it's also used for
all the weapons. Black plastic is used for the torso core, shoulder roots,
biceps, fists, pelvis back, hips, thighs, knees, kneepads, boot cores, heels,
front soles, and wheels. Bright yellow with a painfully bright UV response
makes the head, backpack, shoulderpads, forearms, pelvis front, outer boot
shells, and tops of the feet.
There's yellow paint on the chest for the roof and window posts, not a
very good match to the plastic. Black face outline and V-like shape on top
of the helmet (but it doesn't go all the way back or fill in the vents on the
sides and back...easy enough customization), plus on the stripe on the left
side of the chest and down the right shin. The face is silver and the eyes
are bright blue, his smirk is not separately painted. There's a red Autobot
symbol printed on the center of his sternum. The wheel hubs are silver.
The neck is a ball and socket joint with the socket in the head, and the
root of the neck strut is on a piece that's got a transformation hinge, which
tends to let the head rock back a bit during normal handling. The waist is a
smooth swivel and unobstructed. The shoulders are a bit odd, with a hinge and
swivel attached to the fender/shoulderpad, but then another hinge between the
shoulderpad and the upper arm. The upper arm hinge is supposed to be pushed
up as far forwards as it'll go, so that the fender points upwards in back.
Not quite the animation model look, but close. There's swivels just above
the hinge elbows, and swivel wrists. Pinned hinge and swivel hips with upper
thigh swivels hidden inside the thigh armor, and hinged knees. The ankles
have a little wiggle room both forwards-backwards and side to side, but are
mostly held into a narrow range by the blockages around the hinges.
The hands can hold 5mm pegs. There's also 5mm sockets on the backpack's
back (for holding the boosters), the outer faces of the backpack (kinda
blocked, more for vehicle mode), the outer faces of the lower edges of the
boots. There's no 3mm sockets, nor are there any sockets in the soles of the
feet.
The booster/thruster accessories are unpainted smoky clear plastic,
despite the boosters in the show being yellow and black with silver fins.
They basically look like footballs with fins. The mold line pattern doesn't
fit the color scheme from the show, should you want to paint them yourself.
Each is 1" (2.5cm) long with a 5mm peg for attachment to the back or use as a
pistol grip, and a 3mm socket for inserting the stinger halves as
thrust-style Fire Blasts (you'd need 3mm peg Fire Blasts otherwise, I have
many thanks to commissioning Trent Troop on Shapeways).
Now, they went with the choice to not give him individual stinger
weapons, not really. I mean, you can mount the half-hexagonal-point halves
on the booster rockets to make stinger pistols or something, but they really
only went for the "hands merge to form the stinger weapon" bit. Stow the
hands as in vehicle mode (open up door panels on the forearms and fold the
fists into the forearms) and peg the two stinger halves together, then plug
the 3mm studs on the ends of each stinger half onto the 3mm wrist sockets
that result. The stinger is 2cm (0.75") long and made of clear plastic with
a silver base and alternating silver and clear blue stripes. The arms can
barely cross together enough to hold this, and there's a pretty limited range
of motion before something pops off. Unfortunately, the angling of the wrist
stumps makes this weapon pretty unusable except in the "arms together in
front of the chest" form, nor is there any other double-socket place the
whole thing can go. There's also nowhere to store them when not in use
except on the boosters.
Transformation: Open the forearms to stow the fists as with the stinger
weapon, but leave the panels open. Lift up the chest so that the chest and
backpack become the car roof, with the robot head tucked inside. And now it
gets weird. Rotate the waist 180 degrees. Fold open the shins and stow the
kneepads, then rotate the fender/hood pieces 180 degrees so the kneecap end
is down by the feet, which fold back in. Snap these together for form the
front third of the vehicle, and bend at a spine joint (not really usable in
robot mode) to bring them up under the windshield. The back bit of the
backpack folds down to become the hatchback gate and rear bumper, then
massage the arms into place as the doors and rear wheels. The colors don't
match up well on the sides behind the windows, but you're supposed to put the
booster rockets in place there to hide that problem.
Going back to robot mode is pretty straightforwards, and it helps to
start by pulling the hood halves apart so you can loosen things enough to get
all the other tabs undone. It's easy to forget to fold out the kneepads.
Altmode: Technically a police car in that Bumblebee copied Captain
Fanzone's car, rooftop light and all. There's surprisingly few hinges
messing up the lines of this mode, really just the ones under the side
mirrors (there's another hinge that's smoothly integrated into the spoiler).
Quite dinky at 3.25" (8cm) long, a little longer total if you count the
booster/stinger combos plugged into the sides near the back. The color
matching is so-so between yellow paint and yellow plastic, but only a little
of it actually had to be painted. Most of the vehicle shell is bright yellow
plastic. The clear slightly smoky plastic of the chest is the windshield and
front of the roof, while the rest of the side windows and the rooftop light
are a plugged in piece of clear slightly smoky plastic fitted into a yellow
structural roof and sides piece. The wheels are black, but the rest of the
black plastic is hidden inside (other than a bit above each rear fender, but
putting the boosters in their intended spots hides this too).
The various paints from the chest remain visible on the front roof
section, with the Autobot symbol now on the roof. The gloss black stripe
runs all the way from the grille to the spoiler (except for the windshield)
on the driver's side, although the hood bit is a little displaced to the side
compared to the roof. The grille itself is also gloss black. The rooftop
light is painted clear red, and the headlights and wheel hubs are silver.
Six 5mm sockets in total are accessible. The two from the backpack are
now on the rear bumper, the ones from the sides of the back are more
accessible and used to hold the boosters, and there's also sockets just under
each hinge behind the front fenders. There are no underside sockets, and no
internal storage for any of the accessories.
Somewhat minimal ground clearance mainly due to the forearms on the
underside, but it rolls well on pinned wheels.
Overall: Other than the usual "Minibot for a Deluxe price point"
complaint Generations/Legacy has been vulnerable to since Earthrise, this
is a pretty good toy.
AUTOBOT: RESCUE BOTS UNIVERSE AUTOBOT CHASE
Assortment: F8525
Altmode: Police Car
Transformation Difficulty: 18 steps
Previous Name Use: None with the epithets
Previous Mold Use: None
Special Unit: Rescue Bots
Origin Universe: Rescue Bots
Technically, he's a Rescue Bot rather than an Autobot, but that
distinction kinda faded over time.
Gotta say, about the only things I figure are less likely than Rescue
Bots in Legacy are Go-Go-Gobots and more obscure and repack-heavy Japanese
lines like Transformers Go! or Kissplay.
Packaging: Five plastic ties hold the robot to the tray, while the
accessories are wrapped in Autobot symbol pattern tissue behind the tray. Be
careful opening it, there's a lot of tiny pieces, ironic for a character who
originates in a child-safe line.
Robot Mode: A somewhat leggy interpretation of the animation model, but
otherwise surprisingly close to how he looked in the original show. The main
differences other than proportions are purely in the realm of colors or paint
apps. He has an Autobot symbol instead of a Rescue Bots symbol, his neck is
the same color as his helmet instead of being the same color as his face, the
fists are black instead of blue, and he has the usual lack of paint on his
wheel hubs. His pegged-on forearm bits (I hesitate to call them weapons, I
guess they're supposed to be sirens or something?) even have the "red one is
round and blue one is trapezoidal" thing going on. They chose to have his
visor opaque rather than letting his glowing eyes show through it. The
lightbar is not removable, but is in its proper position behind the head.
5" (12.5cm) tall in mostly dark blue, white, and lightish gray, with
some silver and clear primary colors. Clear colorless plastic is used for
the torso front (except the panel in the sternum), the lightbar behind the
head, headlights inserted into the "spats" atop the feet, and the
accessories. Dark blue plastic makes up the head, back, sternum panel,
shoulder struts, boot shells, "spats," and feet. Lightish gray plastic is
used for the lower biceps, pelvis core, thighs, knees, and the "bones" of the
lower legs. Black plastic for the fists and wheels. The shoulderpads,
not-quite-wings, forearms, outer pelvis, and hip caps are white plastic.
Lots of dark blue paint with a decent match, found on the center of the
chest, most of each shoulderpad, and panels on the back and butt. There's
some white paint on the non-window parts of the chest that aren't dark blue,
with a red on white Autobot symbol printed on the chest. The face, the
center of the lightbar, and the housings of the siren tools are painted
silver. The visor is painted metallic blue, while the police shield on the
forehead is painted metallic gold. The lightbar sides are painted clear
medium blue and clear red, and the windows and headlights are painted clear
yellow.
The neck is a limited ball joint, although if you don't have the chest
locked down properly the whole neck root piece can fold down a bit on a
transformation hinge. The waist is a smooth swivel not blocked by anything,
although it is a snap-in so be careful of any mold flash in there. The
shoulders are hinge and swivel joints on the ends of struts that can sort of
sag even if you have the chest locked down properly. The kibble winglets on
the back are technically far enough out of the way to not block the
shoulders, but they don't lock out of the way and can fold inward easily.
Swivels just above the hinge elbows, while the wrists just have fold-inward
transformation hinges. Pinned hinge and swivel hips, lower thigh swivels,
hinge knees that can bend a little bit the "wrong" way for transformation
(with little tab and slot bits to hold the legs like that). The ankles only
have side to side hinges, but the heels can fold down on transformation
joints to help with stability in some dynamic poses.
The fists can hold 5mm pegs, and there's 5mm sockets on the outer faces
of the forears, the upper outer faces of the shoulders, one in the small of
the back, one each on the upper outer faces of the boots, and one under each
foot. There is a 3mm socket in the back of the pelvis.
His main accessory is based on the original's Energize Gear Rescue Claw,
made of clear colorless plastic painted clear bright blue. It's made up of
three pieces, a core that fits over either fist or can plug into a 5mm socket
via an unpainted peg, and two claw pieces (also clear colorless plastic
painted clear bright blue) that go into 5mm sockets on the front of the
core. I've found that the Rung-style Fire Blasts can go well in place of the
claw pieces as...I dunno, taser bolts. And the claw pieces can go into the
siren tools to become arm blades. The core also has a 5mm socket on top, if
you want to mount a siren tool on it too? The whole thing assembled as a
rescue claw is 1.5" (3.5cm) long, with a little less than half the length due
to the core piece. The tool stores in vehicle mode on the back, using the
socket that had been in the small of the back.
The siren tools are made of clear colorless plastic with silver paint on
the housing part and clear red or clear blue paint on the business end. The
red one has a round end and is 15mm long, while the blue one has a
trapezoidal end and is 13mm long. Each attaches via a 5mm peg (forearms are
the default locations), and have 5mm socket "muzzles" on the clear colored
part.
Transformation: "Rescue Bot" and "complex transformation, bordering on
frustrating," do not generally go together, but boy howdy do they go together
this time. The thing that took me the longest to figure out without looking
at the instructions was that the sternum bit folds down to let the torso
front fit over the head...the head pops off pretty easily, though, and I was
tempted to just go with that the first time and worry about the right way
later. :) I suspect that doing this right after transforming Bumblebee, who
doesn't need a fold-out panel to get his head inside the roof, primed me to
not look for such a solution here.
Once properly transformed, it is REALLY solid. Like, so solid that it's
hard to get it started on going back to robot mode.
Altmode: A definite police car, no technically about it unlike Bumblebee
above. A muscle car basis with exhaust pipes (unpainted) sticking out in
front of the rear wheels. They did a nice job with various little details,
such as the police shield molded into the center of the grille. The back end
is a little gappy thanks to the way the legs transform, with the tops of the
hips making up much of the rear bumper. This, too, looks like a de-chibified
version of the animation model, good job on the part of the designers.
4.5" (11cm) long in mostly dark blue with some white and silver. The
front third is the dark blue plastic, as are the roof center (the folding out
bit of the chest), a little of the rear window and trunk, but the rest of the
dark blue is paint. The section with the windows from the chest is still
visible clear plastic painted clear yellow with dark blue and white paint.
The lightbar piece is also clear plastic, with clear blue on the right and
clear red on the ieft, but opaque silver in the middle, and the headlights
are clear plastic painted clear yellow. The wheels are black with no paint,
the rest of the vehicle shell is white plastic, with the doors and the rear
bumper left unpainted and the rest painted dark blue. The front grille is
painted silver.
There's 5mm sockets on each door, on the sides ahead of each door, on
the sides of the rear bumper, and one on the trunk lid that's mostly there
for the Energize Gear claw. You can almost store the small siren tools on
the underside in the fists, but they extend a couple millimeters too far
down. This does leave the fists accessible for 5mm peg flight bases. (The
3mm socket from the robot butt is now on top of the rear end of the trunk.)
It rolls okay on snap-on wheels with about 2mm of ground clearance, the
pelvis in back is the main obstacle.
Overall: This does a very good job of looking like a non-kiddie "how
he'd look if he visited RiD15" design for Chase in both modes, although the
transformation required to make this work can be a bit tortuous at times.
The use of clear plastic for some structural joints does make the difficult
transformation more of a worry point, since stress is more likely to happen.
Still, a very good first Generations/Legacy interpretation of a Rescue Bots
original character.
INFERNAC: INFERNAC UNIVERSE MAGNEOUS
Assortment: F8526
Altmode: Stony SUV
Transformation Difficulty: 10 steps
Previous Name Use: None
Previous Mold Use: None
Function: Armorizer
Origin Universe: Infernac
Packaging: Three regular ties and a double tie across the chest hold the
robot to the inner tray, and the usual tissue packet in back for
accessories. Well, the weapon and the vehicle roof, which has to be detached
to let the figure fit in the standard box.
Callout on the back shows Bumblebee wearing the armor bits, but the
instructions show Voyager Animated Optimus Prime wearing them...they fit him
a lot better.
Robot Mode: Between the design of the helmet and some of the stony
frills, this feels like they're at least considering a redeco as The Fallen.
Of course, there's at least two known retools/redecos already in the pipeline
that aren't the Fallen, so I may be guessing too much (retool Nucleous for
regular release, and then a straight redeco as part of the Walmart Capsule
set of Thundertron which throws in a Deluxe and a flag-deco of Ratbat to bump
it up to Leader price point). The build is generally squat, and the chest is
hollow with the gap visible between the wheels that form his pecs. (The
chest cannot fold open unless you detach the shoulders and start
transformation, and the wheels can't be opened up in robot mode in any case.)
5" (12.5cm) tall in various shades and tones of gray (some warm, some
cool), plus some black, a little silver, and yellow eyes. Black plastic is
used for the wheels, elbow joints, hip joints, knee joints, and ankle
joints. The rest is made of fairly neutral medium gray plastic, although a
more flexible variety is used for the back, shoulder roots, biceps, fists,
abdomen, and the upper ankle joint pieces. There's also some unintentional
batch variation that shows up under UV.
There's a cool lighter gray paint on the pecs, the roof of the backpack,
the forearm armor, and the fender chunks on the boots. There's black paint
on the faceplate, vent details on the kneecaps, and the windows on the
backpack. The bumper detailing atop the torso is painted metallic gunmetal,
as is the butt. The trim on the backpack windows is silver, and the eyes are
bright yellow. There's some use of texture to create the illusion of color
changes here and there as well, such as the shoulder fronts. There's no
faction symbol on the toy, just as there was none on the box or in the
instructions.
The neck and waist are smooth swivels. The arms connect via 5mm pegs,
but these are the only joints that are pegs. There's snapped-in lift up
hinges inside the shoulderpads. Swivels just above the hinge elbows, and the
wrists are ball joints that can turn or bend inwards for transformation.
Pinned hinge and swivel hips, swivels just above the hinge knees. Ankles are
hinged to tilt side to side as well as bend forwards for transformation, plus
some forwards-backwards rocking at the end of the transformation strut.
Fully assembled, there's just 5mm socket fists and a 3mm socket in the
back of the pelvis. There's also 5mm pegs on the outer faces of the
shoulders, although none of the stuff in the instructions takes advantage of
them. The backpack is attached via a single 5mm peg that goes into a socket
on the back (and one of the known retools takes advantage of this to swap in
a different roof). The forearm armor pieces are pegged on, with shallow tabs
and slots keeping them from easily rotating. If you want to mount the roof
as a shield on the forearm, you'll need to pop off the relevant armor bit
(which can be stored on the back). The fender pieces on the boots are
removable, exposing two 5mm sockets on each boot.
The weapon is a sort of pickaxe thing 1.75" (4.5cm) long with a 5mm peg
grip and a 5mm peg on the side of the haft that lets it be held as a sort of
crossbow I guess (the side peg can only be used for storing the weapon on the
back if you have the roof off and held as a shield). It also has some
nonstandard rectangular tabs to attaching to vehicle mode, or for making the
hammer weapon that involves the shins and feet as well (see later in the
review).
Transformation: A little trickier than "10 steps" would suggest,
although part of that is the fact that as a figure that's designed to come
apart into pieces, it can be hard to AVOID taking it apart during
transformation. And it's certainly easier to transform if you leave the roof
off until late in the process. It's also easier to get the feet folded onto
the pickup bed if you pop the piece off first. So, technically this can be
transformed without going to partsforming, but in practice...well, bits keep
falling off anyway. One annoying bit is that the shoulder roots need to pull
out a bit to unlock the chest, but this isn't a direction the joint can
really go, it's more a matter of flexing the plastic.
Altmode: A rock-covered pickup truck, with the robot shins and feet
taking up the bed of the truck, and various shardes that maybe were supposed
to be crystal. There's occasional mechanical details, like the mesh-covered
windows in front and on the sides, or a few vents here and there, and the
grille in front with brushguard. Basically, from a distance it looks like a
truck, closer up it looks like a pile of rocks in a truck shape, and even
close it looks like a truck with rocks stuck to it.
4.75" (12cm) long and various shades of gray with some black and
silver. Other than the wheels, which are black plastic, it's all medium warm
gray plastic. The lighter cool gloss gray paint ends up on the roof, the
wheel covers, and the side lower fenders with the crystal splash pattern. In
all cases, the paint has hazy borders on purpose. The windows are matte
black with silver borders, the front bumper is dark gunmetal gray. The
kneecap vents are visible in back as is their black paint.
The front bumper has a non-obvious 5mm socket that the axe can go into
as a sort of vehicular weapon, but the axe is mainly intended to go on top of
the pickup bed junk via non-standard pegs. There's a 3mm socket on either
side rearward of the front wheels. The only connectors on the underside are
5mm pegs.
Armor Mode: This kinda cheats, in that only about half the mass of the
toy becomes accessories, to go by the instructions. The foot/shin pieces
come off and combine with the axe to become a hammer, the forearm armor bits
go on another figure's forearms, the rest of each arm can kinda dangle off
the sides of another figure's boots, and the roof can be a shoulder shield.
The rear wheel chunks are removable, but the instructions have no suggestions
for putting them on anything else, so probably best to leave them in place
and treat the stripped down vehicle mode as a chonky skateboard or
something.
If you make the hammer and still want Magneous to wield it in robot
mode, the rear wheels can be flipped over so that the robot becomes an
unstable ("some poses require external support") wheel-foot bot.
Loading Image...

Overall: A decent design for the whole Rock Lords homage, although I'm
not sure I'd say it's good enough to get three versions of it or more. (I'm
probably only getting the Walmart set with another redeco if I find it at
Ross, for instance.)
AUTOBOT: CYBERVERSE UNIVERSE WINDBLADE
Assortment: F8528 (skipped number might be part of the next wave)
Altmode: VTOL jet
Transformation Difficulty: 16 steps
Previous Name Use: None with that epithet
Previous Mold Use: None
Origin Universe: Cyberverse
Note, mine was misassembled or had a molding error that prevented
correct assembly, so the canopy wasn't flush against the cockpit piece. When
I tried to adjust it, it simply snapped off entirely, since it was only
connected at one of the two tabs. I think what happened is that it wasn't
pushed in properly and the glue just pooled in the bottom of the forward
slot, so I had to Dremel it out to get the tab to go in and reglue around the
snapped part. This theory was confirmed when the Dremel's first-removed
stuff was clear colorless instead of the red plastic of the fuselage piece.
No idea how common this assembly error is, but it's hidden in the backpack
in-package so you can't really check for it before buying.
Packaging: Six ties hold the robot to the tray with the wings way up.
The sword and the headdress piece (a "tessen fan") are wrapped up in the
tissue bundle in back.
The tip of the nosecone should be folded up for robot mode, but the
instructions don't have that "get it out of packaging mode" stuff.
The box render shows the hoverfans unpainted, or has the unpainted side
facing the camera in both modes. Mine was packaged with the painted side
facing backwards in robot mode, but it's hard to tell from the monochrome
instructions whether that was intended. Since they're adjustable, you can
always make the painted side face whichever way you want. TFWiki suggests
that this is so that you can either have show-accurate silver/gray or
toy-accurate black.
Robot Mode: While this is supposed to be the Cyberverse version, and the
body does a pretty good job of matching that within the bounds of "can
actually transform," they went with the head of the original Generations head
from 2014 (including the detachable fan) instead of the Cyberverse design.
This makes me wonder if anyone's already made a "show-accurate" replacement
head for this toy. Anyway, like just about every RiD through Cyberverse
character, the toy lacks a lot of the blue glow paint apps (notably around
the hoverfans and in the joints between pelvis and thighs), but she does have
most of the bright blue (unlike the recent Strongarm).
5.25" (13cm) tall at the head, total "shelf height" depends on how you
position the wings. Mostly red and black with some bright blue, gunmetal,
and accent colors. Red plastic is used for the wings (except the VTOL fans),
the backpack shell, torso front, shoulderpads, forearms, pelvis, and boots.
Black is used for the head, torso core, some stuff inside the backpack, the
VTOL fans, shoulder roots, upper arms, hands, thighs, knees, feet, and the
fins on the boots. The sword is clear colorless plastic, more about it
later.
The face is painted pearly white with red makeup, the eyes and tiara
front are bright blue, and there's gold accents around the tiara and on the
hair fan. There's metallic gunmetal on one side of each VTOL fan, on the
abdomen, and on the shins. Bright blue paint is also on the kneecap gems,
the wrists, and the bikini top border on the chest. There's some matte black
paint on the backpack.
The neck is a ball and socket joint with the socket in the head and a
good range of motion despite the collar. The waist is a smooth swivel,
although if you have the sword on the hip it can get in the way of the
backpack if you turn too much. The wings have double hinges so they can go
up and down or flap a bit (the backpack restricts this). The VTOL fans are
on axles that let them swing around, and they snap in place. The shoulders
are pinned hinge and swivel joints, with the lifting hinges being soft-
ratcheting. Swivel at the top of the bicep, hinge elbows, swivel wrists.
Pinned hinge and swivel hips, upper thigh swivels mostly concealed by the
thigh armor, hinge knees. The ankles have sideways hinges, plus the toes are
separately hinged to fold down.
The hands hold 5mm pegs, but with only 3/4 of the circle, so they do
have trouble with 5mm by 2mm tabs. Shallow 5mm sockets on the fronts
(undersides) of the wings, two on each wing. There's a deep 5mm socket on
the underside of each toe and of each heel, and deep 5mm sockets on the outer
upper faces of the boots. There's a 5mm socket on the back of each
shoulderpad, but I'm not sure why...they're covered by the wings in this
mode, and even more covered in vehicle mode. No, the wings can't really gold
out the the way much due to the backpack, not enough clearance to really do
much with this socket. There's the usual 3mm socket on the back of the
pelvis, plus one on the outer face up each upper thigh so you can stow the
sword there. There's also 5mm pegs on the boots, but they're for
transformation and only about 2mm of peg sticks out far enough to connect
anything.
Unlike most Windblade swords, which tend to be either solid metal of
some sort of clean energy blades or crystal shards, this is more of a torch
with flames writhing around in the vague shape of a blade. This is so that
it can sort of double as exhaust flames in jet mode. A single piece of
colorless clear plastic 4" (10cm) long, with a 5mm diameter hilt that thins
to a tab at the pommel (2.5mm thick for the last 5mm of the hilt, which is
long enough to keep the sword from plugging into even the deeper sockets
other than the hands). The hilt part is painted matte black except for the
3mm studs on either side and a bit around each, while the blade is painted
clear warm purple.
Note, while shown as a removable accessory, the hair fan is kinda
difficult to get back out once inserted. I needed a knife or similar thin
wedge to get it back out. Also, because of the 3/4 circle hand sockets, the
fan can only be held at a specific kinda weird angle. Fortunately, and not
revealed in the instructions (I found out from TFWiki) the slots in her palms
let the fan be inserted more securely and held more like a proper fan. This
slot is too narrow to put the sword pommel in it, though. Anyway, it's...
very easy to lose, and I ended up taking a rather long time searching for it
after dropping it while trying to measure it. It took a weird bounce, as
often happens thanks to Murphy's Law. Anyway, it's 13mm tall and 17mm wide,
with a rectangular tab on the back to attach to Windblade's head, and a
rectangular 5mm by 2mm tab for holding as a weapon. I recommend just putting
it on her head and never taking it off again.
Transformation: Important note, the backpack opens up to unfold the nose
end, but the hinges are at the top rather than the sides! It opens like
beetle shell pieces rather than like doors. Then it folds closed around the
head, and it's easier to get the nose wheel out before closing it. Rotate
the waist 180 degrees, and them the boots split apart weirdly to fold around
the thighs, with the backs of the boots tabbing onto the backs of the thighs
to provide the rear supports (they're more fins than landing gear, but they
do the job). Before you finish connecting the legs up, put the sword between
them using 3mm sockets on the insteps of the feet. The wings fold into place
around the knees, and the robot hands grip 5mm pegs on the backs of the shin
pieces (not mentioned in robot mode, because they're not really useful for
anything in that mode).
As noted above, you need to insert or remove the sword at a particular
point in transforming the legs. Getting it in or out later requires slightly
untransforming the rear part of the jet. If you'd rather not mess with this,
the hilt side pegs can also go into the pelvis-back socket on the underside.
It can still only point backwards here, the breasts get in the way of the
blade pointing forwards.
Altmode: A little bulkier than the animation model, but sleeker than
some interpretations of the VTOL jet mode. The robot arms just kind of stick
to the sides, with the fists grabbing onto pegs, but otherwise it's decent.
It has small VTOL rotors on the leading edges of the wings, and a clear
canopy which may or may not lie flush with the nose. The kneecap details are
just sort of on top of the fuselage, but the shin details look like they
could pass for vectored thrust intakes.
Ignoring the sword sticking out the back, it's 6" (15cm) long with a
wingspan of 5.5" (a little under 14cm). The vertical and side tail fins are
black plastic, as are the thrusters. The nose and nosewheel are black
plastic, the canopy is clear colorless plastic. Other than some visible
joint bits, the rest is red plastic.
There's matte black along the leading edge of the wings and the
underside of the nose. The canopy window borders are painted red. The dark
silver of the VTOL fans and the shins is now on top, as are the bright blue
kneecaps.
The four 5mm sockets on the wings are mostly accessible, although the
ones nearer the roots are almost blocked. The thruster nozzles (robot heels)
are 5mm sockets, and the pelvis rear's 3mm socket is on the underside as
noted earlier. The toe sockets are no longer accessible, the hands are on
pegs but I suppose could be folded out if you needed even more underwing
connections. And, as noted in robot mode, the back of shoulder sockets are
half covered by the wings now. I really wonder why they even bothered,
unless the main purpose was just to have posts to support the wings better
and they decided to make 'em sockets just in case it could be useful somehow
in robot mode. The nose wheel is hinged to fold down, while the rear
supports/fins are fixed in place. Note, the sword hilt's thin pommel does
not allow it to connect to any 5mm sockets shallower than the length of the
tab, which basically means all the ones available in this mode unless you
pull out an arm for weird hybrid mode.
Overall: I have a lot of Windblade toys, most of which are on or near my
Metroplex for obvious reasons, and this is definitely one of the better
ones. I'd put it with the original Generations version, better in some ways
and not as good in others.
Dave Van Domelen, will take a break to quickly cover Page Punchers
before going back to more Legacy.